SMF June 2019 Challenge - Rimmed Soap

Soapmaking Forum

Help Support Soapmaking Forum:

This site may earn a commission from merchant affiliate links, including eBay, Amazon, and others.
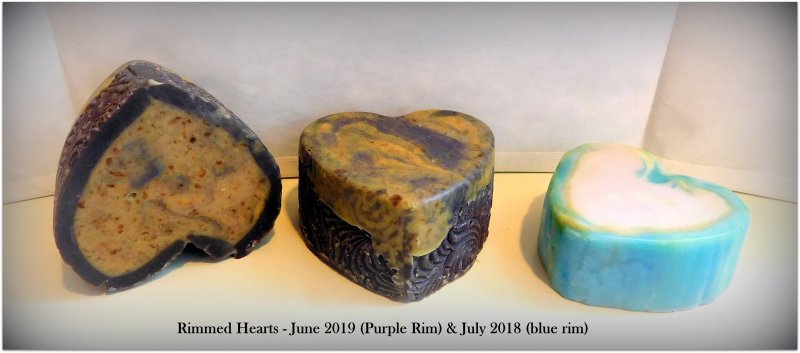
Susie asked if I could share my Rim recipe so I will do so, and also include some suggestions I have found in the last couple of months on how to make a Rim more pliable.

The one I used for this soap:
Rimmed Woodsy - Scarf Joint 2019June.JPG

32% OO
27% CO
21% HO Safflower Oil
12% Shea
6% Cocoa Butter
2% Soy Wax

vegetable glycerin (2% of oil weight) added for increased pliability

[33.33% Lye] concentration (or 2:1 water to lye)
3% SF

EDTA, silk, ROE (per usual - optional)
FO is also optional, but I did use a non-accelerating FO


I don't normally use that much CO, but I was adapting another recipe I had access to and decided not to alter it too much until a later try. It is only the rim, after all.

I have not tried it, but have read that using Castor Oil at 10% also helps with pliability.
And others suggest a higher SF as well, in the 7-10% range, but I didn't try that either.

The recipe for the Purple Plumeria Soap was on different from the one above a tiny bit in the percentages, no glycerin and a 4% SF. It was poured as a single thinnish layer of soap on a freezer-paper lined cookie sheet. It was pliable, but not as much as I would have liked, which is why I added the glycerin to the Woodsy Rim.

Besides the importance of gelling and the recipe itself, I found that the thinner the rim, the easier it is to bend without breaking. AND train the rim around the mold s-l-o-w-l-y. Trying to mold it quickly caused cracks, especially with the thicker cut rim.

I hope that helps.
 
Has anyone tried warming the soap for the rim before rolling and forming it? I've been wondering if this would add enough pliability to the soap to be worth the hassle.
 
I tried it years ago when I took a stab at it - but it didn't work for me. Warming might work with the right recipe though (I'm 98% positive that my previous failure was totally due to my recipe).

I'm hoping to have time to take a stab at this later next week - making a note to add glycerin to the recipe to see if I can be successful. My biggest challenge was figuring out what to use for the rim mold so that I would make a big enough piece to fit in my PVC tube. I was coming up short on the perimeter with all of my ideas. I got a new round cavity mold on Weds for another project, and just had a light bulb moment that I might be able to make the cavity mold by turning and cutting the rim because the height will be shorter (if that makes sense). I have to do the maths yet (and by that I mean I am going to have my husband do the maths) but my plan is starting to come together...
 
I had a round mould delivered yesterday, been wanting one for ages so this was a good excuse. I'll have a crack at it over the weekend hopefully
 
Just a bit of advice on using longer round molds: If you can't get your hand inside, get a long wooden dowel to help smooth the seam joints. I actually planned to make a round rimmed soap in a long mold and gave up because I couldn't get my hand inside and my wooden dowel wasn't long enough. That's why I switched to the short Pringles cans. Plus I could make smaller batches.
 
1. steffamarie - why the heck not?! I'm only slightly terrified ;P
2. TheDragonGirl- This looks exciting and I already know what I want to do
3. MarnieSoapien - It's not what's on the outside that counts. Wait a minute...
4. dibbles - I see some Pringles in my future
5. Primrose - yes! Been wanting to try this for ages
6. msunnerstood- Im up for a Challenge
7. Serene- Earlene is hosting, I must.
8. AMD - I'm b-rimming with excitement over this challenge! (someone had to do it, right?)
9. Artemis - I have an idea, let's see if I have the time!
 
Thanks for being the voice of experience, @amd -- I appreciate your thoughts....
 
Yes, I did the same thing, thinking I could soften the rim by heating it. That was my super fail due to the recipe I used and nothing else. I did not try to heat the successful rims.

I have decided to test out the 10% Castor Oil idea in my recipe and see how that performs compared to the 2% Vegetable Glycerin. I will report on it tomorrow after it gels and I try training it around the circular mold.

ETA:
It is in the oven. I chose to do an alkanet lye solution colored soap. So the center of the soap will have to have some brilliant colors to contrast with the exterior. That is if the 10% castor makes the batter pliable enough.
 
Last edited:
Well, all, this is testing me. Rims #1 and 2 have now failed. #1 was going to be uglier than homemade sin so I slapped it in a loaf mold and had done with it. #2 had the looks but not the flexibility. Tried to pour it as an all in one to avoid having to cut a slab up but it was uneven. Too thick to use on its own, but too thin to make into a thinner slice. Sigh. Maybe the third time will be the charm? I suppose I’ll go for a thicker slab and just cut the darn thing like I should have done in the first place.
 
1. steffamarie - why the heck not?! I'm only slightly terrified ;P
2. TheDragonGirl- This looks exciting and I already know what I want to do
3. MarnieSoapien - It's not what's on the outside that counts. Wait a minute...
4. dibbles - I see some Pringles in my future
5. Primrose - yes! Been wanting to try this for ages
6. msunnerstood- Im up for a Challenge
7. Serene- Earlene is hosting, I must.
8. AMD - I'm b-rimming with excitement over this challenge! (someone had to do it, right?)
9. KiwiMoose - Oh alright then. You've twisted my rubber arm.
10. Amy78130- Fun!!!
 
1. steffamarie - why the heck not?! I'm only slightly terrified ;P
2. TheDragonGirl- This looks exciting and I already know what I want to do
3. MarnieSoapien - It's not what's on the outside that counts. Wait a minute...
4. dibbles - I see some Pringles in my future
5. Primrose - yes! Been wanting to try this for ages
6. msunnerstood- Im up for a Challenge
7. Serene- Earlene is hosting, I must.
8. AMD - I'm b-rimming with excitement over this challenge! (someone had to do it, right?)
9. Artemis - I have an idea, let's see if I have the time!
Wait... Didn't I sign up already?

Yes, you did, artemis! Here is the corrected sign-up list:

1. steffamarie - why the heck not?! I'm only slightly terrified ;P
2. TheDragonGirl- This looks exciting and I already know what I want to do
3. MarnieSoapien - It's not what's on the outside that counts. Wait a minute...
4. dibbles - I see some Pringles in my future
5. Primrose - yes! Been wanting to try this for ages
6. msunnerstood- Im up for a Challenge
7. Serene- Earlene is hosting, I must.
8. AMD - I'm b-rimming with excitement over this challenge! (someone had to do it, right?)
9. Artemis - I have an idea, let's see if I have the time!
10. KiwiMoose - Oh alright then. You've twisted my rubber arm.
11. Amy78130- Fun!!!
 
Yes, I did the same thing, thinking I could soften the rim by heating it. That was my super fail due to the recipe I used and nothing else. I did not try to heat the successful rims.

I have decided to test out the 10% Castor Oil idea in my recipe and see how that performs compared to the 2% Vegetable Glycerin. I will report on it tomorrow after it gels and I try training it around the circular mold.

ETA:
It is in the oven. I chose to do an alkanet lye solution colored soap. So the center of the soap will have to have some brilliant colors to contrast with the exterior. That is if the 10% castor makes the batter pliable enough.


Report on 10% Castor Oil for rim:

I made a small change to the previous recipe that I used for the successful Woodsy Rim (posted & pictured here). I actually altered the recipe a bit more than just changing for Castor oil. I wanted to use up the last bit of RBO from a bottle to get rid of the bottle, so included that as well. So there are a whopping 8 oils in this recipe, but I feel it's only fair to give you all the facts.

I also decided to test using re-heating of the rim prior to coaxing it into a curve or circle using this recipe since I did not feel a need to do so with the prior successful rim.

Recipe:
30% OO
21% HO Sunflower
15% CO
12% Shea
6% Cocoa Butter
4% RBO
2% Soy Wax
10% Castor

I poured onto a fondant-mat-lined cookie sheet to make a single layer rim (not to be cut thinner). Then I covered it with plastic wrap and unfortunately caused some air bubbles beneath the plastic wrap, followed by a towel as insulation while in the oven. It gelled with CPOP, and I left it in the oven overnight. This morning it removed easily from the impression mat and I began working with it while at room temperature (about 74°F). I cut a rim for the round mold. And used the mold as the curve-training tool.

The only problems I encountered were areas where air bubbles formed under the plastic wrap were fragile when I began very slowly rolling the rim over the round mold. Filling in the holes with extra bits of soap did not help strengthen the fragility. The rim cracked in one spot that was very thin because of the air bubble.

I believe it would have worked much better as a multi-layer Rim Slab such as I used in my Woodsy soap and cut with the the mud-wire and with the multi-height soap cutter. I am positive the lack of uniformity of thickness was the issue with the round rim.

Then I decided to test it heated, and after cutting more pieces to create smaller rims in individual molds: oval and heart shaped, I put them into the oven and brought them out again at about 99-103°F. I took out the pieces as needed, which is why the range of temperature.

It did improve the pliability a tad, maybe even more than a tad.

The easiest rim was the oval shape. I will have heart-shaped rim soap, but it was the hardest one to manage and I had to do some patching with the top part of the heart shape.

What I learned from this:

The multi-cut method works better for me as I get more uniformity in the thickness of the rim, and I prefer this method.

For a single layer rim, however (if I choose to do it that way again), in future I will not put plastic wrap directly on top of the layer of wet soap. I will use an inverted box instead to create extra insulation inside the oven, once my desired temperature is reached and insulate the box with a towel.

Cutting the rim into the desired shapes to fit the molds using freezer paper templates & then laying those out on a lined cookie sheet in the oven and heating to about 25°F above my room temperature does help with pliability when the rim is already pliable. (It does not work with a rim that is not pliable, as I have tried that before and it did not help at all.)

I would be interested to hear more about other rim recipes people are using with the single layer method and what seems to work best for them.

Remember, there is a tutorial for a MP Rimmed soap and that one is done with a single later rim. So that's another option. I posted it in the first post of this thread, but here it is again:
http://bysteso.blogspot.com/2015/07/blog-post_22.html

And also remember, not all rimmed soaps have to be round! But I do understand wanting to master the round rimmed soap and to master the perfect rim. It truly is a challenge.
 
Well. 3rd rim is currently in a pile angrily cut apart and smashed into a lump after having pushed me to max frustration level. I tried a recipe with more soft oils and 15% castor and the recipe is fine, but I think I'm gonna have to change my design. I was going for a nonpareil swirl and that's just not going to work. Dragging the chopstick through ends up "cutting" the soap apart and when I try to bend it, even if it's still warm from gel, it just cracks and falls apart into pieces.

So. This weekend, when I've recovered from my temper tantrum, I'll give it a fourth try with an altered design that doesn't require me to do that "cutting" thing. Ugh. Annoyed. This is a challenge for sure!!!!
 
I was working on my soap inventory (reduction via gifting, and prepping others to package) and ran across rimmed heart soaps I made last July. So this thing I have about wanting to make the perfect rimmed heart soap is not a new thing. I'd forgotten that I had tried it before. They didn't turn out very well, which is probably why I chose to forget them. It was a completely different recipe I used back then, but I wrote in my notes that I tried to heat up the rim to make it more pliable and it didn't work. Also in those notes, I wrote: 'should do the rim within a couple of hours of removing from oven, but waited too long'. I am not sure where I got that information, but it was probably from one of the tutorials I read last year. So that might be something else to keep in mind the next time.

Here is a photo of the two together:

blue rim - July 2018; purple rim June - 2019

full


You can see where the rim cracked in the purple soap a the sharpest bend in the soap on the left. The blue rim soap was obviously even less pliable and this was the best of the 4 and I tried my best to clean it up and make it look better. It started out a lot worse looking than it is in this photo. So the quest to make the perfect rimmed heart started a year ago and I didn't even remember it! Well, obviously I am not there yet. I believe the recipe matters even more in a heart shaped rim than in a round or oval rim. I still need to fill the oval rims I made. They are covered in plastic wrap so they won't dry out, but I better get to that asap.

I hope you are all having fun with this challenge.

PS. Interestingly the purple color I obtained from Alkanet root powder is about as perfect a match as one could hope for with the purple using Majestic Purple Mica from Steph's Micas & More (in the center soap batter in the two soaps on the left.)
 
@earlene would doing the heart shape in two pieces and using the mitering technique (which you seem to do very well) work for this? Having only one pretty lame rimmed soap attempt and no mitering soap for experience, I don't have any experience to draw on. It just occurred to me that it might be a possibility.
 
@earlene would doing the heart shape in two pieces and using the mitering technique (which you seem to do very well) work for this? Having only one pretty lame rimmed soap attempt and no mitering soap for experience, I don't have any experience to draw on. It just occurred to me that it might be a possibility.

So true. That's what I tried to do with the purple rim and still it cracked at the top curve on both sides. Come to think of it, I do believe the thickness of the rim also played a part. If I could manage a thinner cut, I think it would bend more easily. I will try and remember that for my next attempt. Thank you, dibbles. That was very helpful!
 
First rim attempt in the oven gelling. Fingers crossed that it's pliable enough. I did some calculations and thought 200 grams would be about the right size for the rim. What I didn't take into consideration was my usual mixing container is 1 kg and 200 barely covered my immersion blender blades. I ended up with a lot of air bubbles in my batter. I banged and banged my mold on the counter. I hope the air bubbles don't cause breakage. Lesson learned, use a smaller mixing container!
 

Latest posts

Back
Top