


aihrat
Gently gently
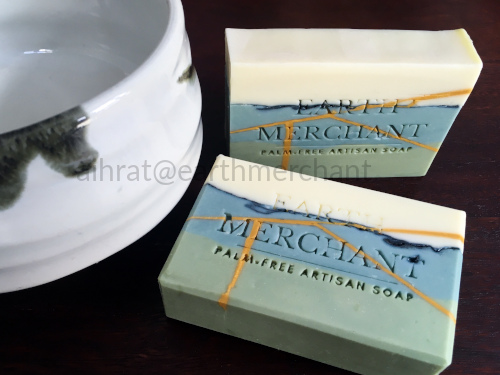
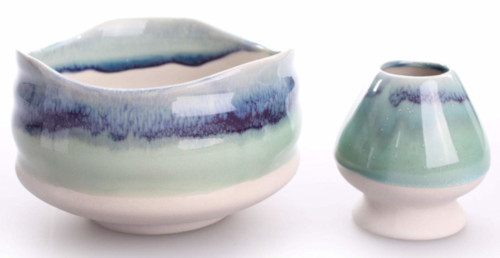
Here's the soap next to a Japanese tea bowl gifted to me by a cherished friend. I'm not a big matcha drinker but I use the bowl for cereal every morning. If the bowl ever broke, I'd like for it to be repaired with Kintsugi. :
Hopefully this will be inspiring to someone out there. You can skip to the pictures and tutorial in the next post if you don't feel like reading the writeup. I would really love to see a masterful execution of the concept.
Writeup
Background
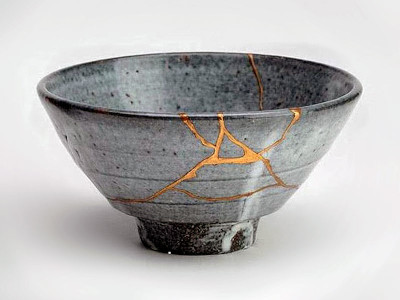
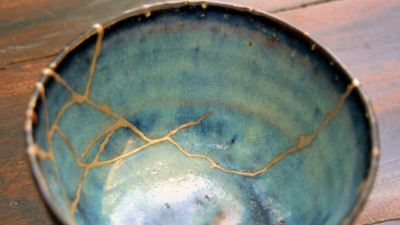
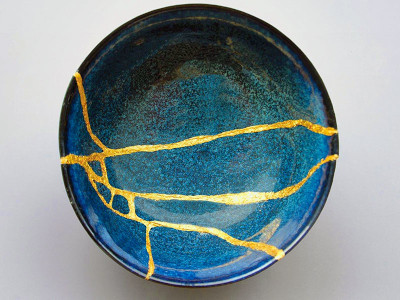
A while ago I came across the wikipedia entry for Kintsugi, the Japanese art of repairing broken ceramics with gold or gold-dusted resins, backed by the intriguing philosophy of "wabi-sabi".
From Wikipedia:
[W]abi-sabi (侘寂) is a world view centered on the acceptance of transience and imperfection. The aesthetic is sometimes described as one of beauty that is "imperfect, impermanent, and incomplete".
[...]
Characteristics of the wabi-sabi aesthetic include asymmetry, roughness, simplicity, economy, austerity, modesty, intimacy, and appreciation of the ingenuous integrity of natural objects and processes.
The art of Kintsugi is said to represent an acceptance that the breakage of a ceramic piece is part of its life cycle, and for such wear and tear to be integrated holistically with the piece instead of something to be rejected.
I'm no philosopher, but the repaired ceramics are really beautiful, and I decided I really wanted to make soap that looked like them.
One other example of this currently exists that I could find online, which I found by googling "Kintsugi soap". This soap was posted by Reddit user rifrif and the breakage and repair effect was done with mica lines and glycerine rivers. It's a really beautiful soap. But I wanted to create something with stronger lines, and to perhaps emulate an organic break-and-fix more authentically.
I actually first started work on this concept three weeks ago. I thought of making soap crack naturally with overheating or otherwise fissuring the soap, but it seemed too difficult to get consistent results for a Kintsugi aesthetic that way. It might have also caused the base loaf to saponify too quickly for the gold resin soap to stick. Then last week I saw that @newbie had posted a tutorial for "fissured soap" for the SMF Challenge this month. I was absolutely blown away by the stone soap they made! It's mindblowing, next-level s***. Absolutely stunning. However, I think I will leave the fissuring to the experts for now. :
For my Kintsugi project, I decided I would simply make soap loaves, carve them out, and then "repair" them with gold soap. The actual method is pretty straightforward, but hopefully my journey will be interesting and informative for people want to try it themselves. I imagine advanced soapmakers would be able to do this with a little more finesse than I did.
Design
I'm not good with soap designs, I barely used soap colourants in my previous batches. In fact after soaping for nearly 2 years, I only made my first semi-successful layered soap less than a week ago, thanks to lovely advice from @jcandleattic, @lsg, @geniash, @SaltedFig, @Steve85569, @HowieRoll, and @amd. Thank you all so much! I got a variety of advice in the thread and I intend to try out all the methods in my future soapy endeavours. :
For the base soap I found a picture of a cheap Chinese tea bowl ("chawan") online with a white, blue and teal pattern and tried to make a soap like that. My first few attempts was just trying to get the colour of the bowl with some dark rims. My last attempt I used a green layer of soap to try to emulate matcha in the chawan. My reference image:
The pattern was definitely not inspired by the refined raku ware that is prized for tea ceremonies in Japan, as I found the colours to be a bit too dark for my liking. but maybe a raku ware soap would look very nice with a matcha-coloured base layer.
The gold soap was just gold soap. I had some Flash Yellow mica from a Bramble Berry reseller that I aged with some blue, red and orange micas.
Method Notes
I did a lot of premeditation on this soap concept because I didn't want to fail. The soaps mostly worked out and didn't give me too trouble with crumbling or separation along the gold soap. I like to believe that it's because I thought things through, but it's also likely to just have worked because I didn't do anything that made it "not work". The solid pieces of advice I can give for this can be summed up as:
- Do not gel the base soap loaf before you carve and fill it
- Water discount the base loaf
- Gel the gold resin soap
- Do not use sodium lactate
- Wear a face mask when working with micas because the gold soap uses a lot
It was important not to gel the soaps, as gelling would be egging saponification to completion. If the base soap loaves gelled, the new soap would have trouble sticking to the base loaf and the repair would likely fall apart.
I usually water discount to close to a 1:1 water:lye solution. I also add sodium citrate solution to my soaps because I have hard water. When I add my citrate solution at 3% sodium citrate, this makes an effective lye concentration of 1.3-1.4:1 water:lye. I think this is a good amount for this particular recipe - it helps the soap firm up before saponification has gone too far. It also helps with preventing gel phase in base loaf at ambient temperatures.
Speaking of firming up, the recipe I used was designed to unmould well after 24 hours despite being a slow-moving recipe. It is included later in this post under the Tutorial section. I am very fond of the recipe as it is hard, mild, bubbly, long-lasting and slow to trace, and I hope you will like it too.
I soaped cool which was mostly habit, but I think it does help preventing gel phase as well. I didn't measure the temperature of my oils exactly but it was warm enough to keep the citrate solution from precipitating and warm enough to prevent false trace and stearic spots, around 30-35C. I used lye solution from a cooled masterbatch.
I was careful to carve out the soap and pour the "gold resin" soap immediately after doing so, to help the new soap and old soap stick.
In my previous attempt I made two batches. In one batch I used 60% sodium lactate solution at 1 teaspoon per pound oils. In the other batch I forgot. In the end the batch without sodium lactate didn't crumble during carving as readily as the batch with SL added.
Carving the soap out was a bit tricky. I did it after unmoulding in 24 hours. It was hard to carve nice cavities into the soap without crumbling. It was easier in a batch without sodium lactate, but I was worried about denting the outside soap as I handled it roughly. However, the batch without SL worked out better as the soap was more pliable, and I did not experience any serious problems with denting while carving.
Getting an organic break pattern was not easy. For my first attemps I just did a cut down the middle and some cuts bisecting that. It looks alright but not as striking or organic as I would have liked. My "gold resin" soap for these designs was very runny and that helped fill in the gaps. But for the last attempt I wanted to have a thicker "gold resin" soap that could support a free-floating piece of soap. I brought the "gold resin" soap to a thicker trace and used a pipette to pipe the thicker soap into the vertical gaps.
I had some difficulty getting a strong gold colour in the "gold resin" soap, especially when ungelled. I dispersed gold mica in almond oil and added it to my batch. The resin batch had a really heavy mica load and would probably stain a washcloth, but I figured it would be fine since the gold soap makes up only a small proportion of the finished product. I had to add a lot of dispersed mica to the batter and had to decrease the superfat to compensate.
For my last attempt I thought it would be nice if I could gel the whole soap loaf after the "Kintsugi" repair and the gold mica could be more sparkly in the translucent soap base. I asked around on these boards if older soap could be gelled with CPOP and got very helpful answers from @newbie, @midnightsoaper, and @artemis - thank you all very much! Unfortunately with a steep water discount I was unable to figure out the correct temperature to set my oven in order to gel the whole loaf. I did 2 hours at 80C, which seemed to gel the gold portion. I did not pursue it further as I was happy enough with the gelled gold portion. It had more luster than my previous attempts.
Tutorial
I don't like being prescriptive with instructions so if some of the tools/techniques specified don't have reasoning behind them you can probably substitute with your own methods. These are just the steps I took to make mine which, when followed, would give reliable results.
The recipe is an adaption of my usual Slow Mover recipe with soy wax substituting the cocoa butter. It makes a good hard bar of soap with an enjoyable lather. I think it would work well with cocoa butter, I just didn't feel like being spendy with my experiment. I also think the soy wax gives it a good texture for carving and don't know if cocoa butter would make it crumble more readily.
Apologies for no pictures of the steps - to be honest, I was too embarrassed with the mess during carving and chose not to take pictures for that reason. I would have taken more pictures if I knew the soap would work out.
")
Equipment
- 1 x Crafter's Choice 1501 silicone mould (wood mould might insulate too well but can't say for sure)
- Some pipettes
- Large chef's knife with thin blade
- Spatulas
- Stick blender
- Misc soap and mica containers
- Breathing mask (VERY NB)
- Almond Oil, sweet 25%
- Castor Oil 5%
- Coconut Oil, 76 deg 10%
- Olive Oil 25%
- Shea Butter 25%
- Soybean, fully hydrogenated (soy wax) 10%
- Non-accelerating fragrance, because it's important that the soap loaf does not gel/fully saponify before you pour the resin. I used 20g Tea Tree essential oil and 2g May Chang oil.
- 5% superfat
Gold Resin Recipe (80g)
- Almond Oil, sweet 25%
- Castor Oil 5%
- Coconut Oil, 76 deg 10%
- Olive Oil 25%
- Shea Butter 25%
- Soybean, fully hydrogenated (soy wax) 10%
- One heaped tablespoon gold mica, add more to taste, dispersed in as little sweet almond oil as possible (approximately 5-8g)
- Non-accelerating fragrance, because the resin needs to be a scoopable consistency
- ~0% superfat
- Run the oil values through a Lye Calculator. If you're not using citrate solution or other extra liquids, aim for a 1.4:1 Water:Lye ratio. If using citrate solution at 3% citrate use a 1:1 Water:Lye ratio for your lye solution.
- Make the base loaf. Use the mask to handle micas. You can colour it however you like and put your special sauce in it as long as you prevent the loaf from heating or gelling. For one of my first loaves I added 1 tablespoon goat's milk powder to the oils. I kept my soap at light trace when pouring. Put in a cool dark place. If you feel it heating up too much give it a time-out in the fridge.
- Unmould as soon as the base loaf has hardened, after approximately 24 hours.
- Ready your oil mixture and all additives for the resin soap. Run the oil values through a Lye Calculator. If you're not using citrate solution or other extra liquids, aim for a 1.4:1 Water:Lye ratio. If using citrate solution at 3% citrate use a 1:1 Water:Lye ratio for your lye solution. Use a mask when working with the mica, there is a LOT of it and I found that working with micas exacerbated a lung infection I had already and made it difficult to breathe.
- Use a large chef's knife with a thin blade to cleave the loaf in two, either horizontally or vertically. Then use the knife to break up the loaf further into long pieces. Skew, jagged lines look more organic. When you intend for there to be a "seam", shave off enough soap to make space for the resin. A large knife will give better results than a small knife as it's easier to make a clean vertical cut with more weight. A small knife can be used to add detail. It's not the end of the world if the soap cracks, just make sure it's filled in.
- Make the resin soap batter and bring it to pudding trace. Make sure your mica is dispersed and ready in a soap-safe container. I used a ramekin.
- Pour the resin soap batter into the mica, mixing as you go. Stop adding soap batter when the colour starts to look diluted. You may not finish the uncoloured resin soap batter.
- Place the pieces that make up the bottommost layer back in the mould. For vertical seams, use a pipette to pipe the soap into the gaps. For horizontal seams, spread the resin soap on to the surface with a spatula before setting the top soap piece on the resin. Assemble the soap loaf with the rest of the resin.
- Press the top of the loaf downwards gently if you have horizontal seams, and press the sides of the loaf inwards gently if you have vertical seams.
- CPOP the finished loaf. I did 2 hours at 80C in the oven with a towel underneath the silicone mould. I did not get silicone rash, possibly because of the water discount. This should gel the gold seams, but you will probably need a temperature higher than 80C to gel the entire loaf. Unfortunatly I can't tell you the exact values for that.
- Unmould and cut after 24 hours.
- Trim the gold parts if desired.
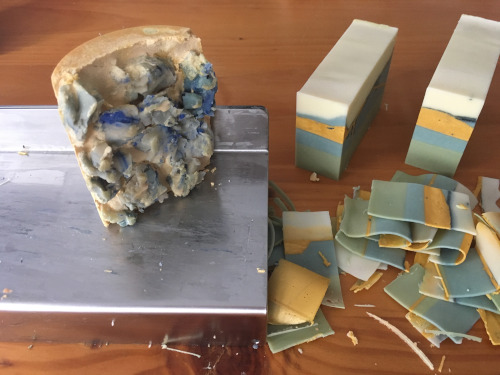
Here's the soap fresh from the slicer:
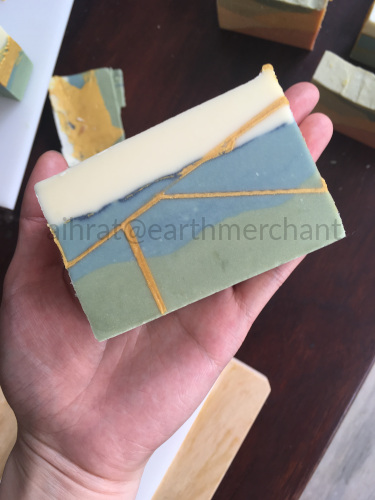
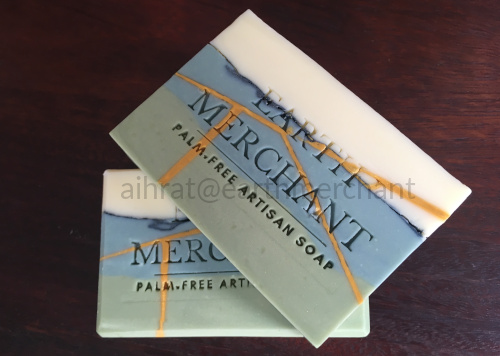
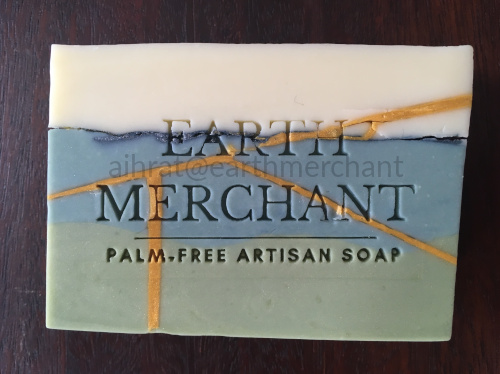
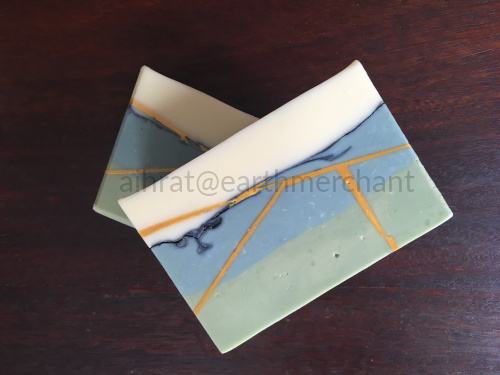
Bevelled and finished bars. I'm really happy with how it turned out. The stamp is just for fun. I like to pretend I have a soap company. But with the stamping you can see that the gold soap goes through the entire bar instead of just being painted on the surface:
Here is a closeup of one of the unbevelled bars. Here you can see that this bar is about to separate along the mica line. The moral of the story is don't overuse mica in pursuit of the cool dark-rim effect. :'(
Here is the reverse side of the soaps:
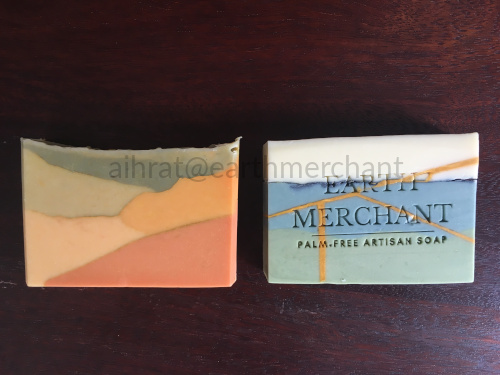
A side-by-side comparison of mica lines to soap glue method. I didn't really intend to post pictures of the mica line soap, as it was practice for soap layering and I just tried to do the diagonal soap tutorial posted by the incredibly talented Tania of Soapish. But I thought the comparison of the line thickness would be interesting for you all to see:
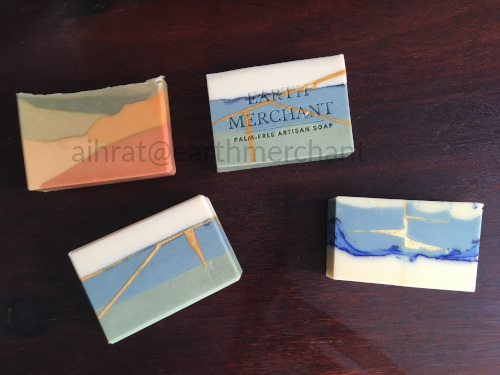
Here's a comparison with one of my older batches (bottom right). The older batch's resin soap included sodium lactate, was not gelled, and turned out pale and crumbly. You can see that the "gold" soap looks kind of awful. I would definitely recommend CPOPing the soap after the "repair" and leaving out the SL. The blue on the older batch looks really good and close to the blue-on-white china effect I was going for, but unfortunately the ultramarine just leaks and gets everywhere:
I would love to make this soap again. Wouldn't it be lovely to have a Kintsugi soap with a pattern reminiscent of blue-and-white china?
Especially with the entire soap loaf gelled to look slightly translucent like real china! In my earlier attempts I tried to create the blue patterning effect with ultramarine paste but it ended up bleeding colourant, so I will have to investigate some more.Tl;dr you can make "Kintsugi" soap by carving out a soap loaf and filling in the cracks.
Anyways, thanks for reading, and I hope this is inspiring to someone out there! Would love to know if anyone has done this before or tries it!
Bonus Pictures
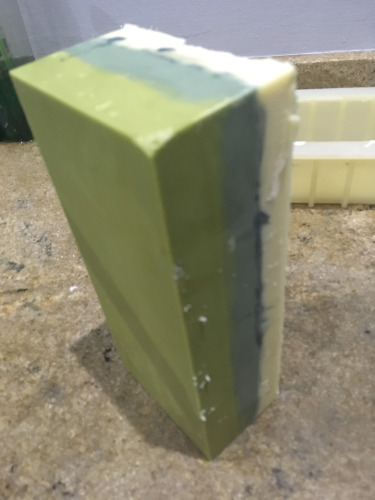
Here's a s****y picture of the uncarved soap loaf. It's fairly ugly and unremarkable on its own:
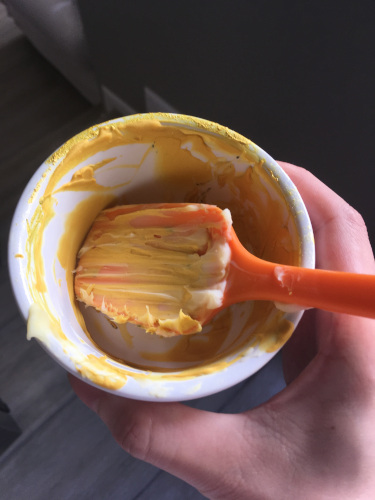
Just a picture of the gold resin soap for reference. I did the repair a few days ago so the soap has dried now, but you can see the mica is very saturated. This soap remained ungelled and is a duller colour than the soap in the loaves which were put in the oven:
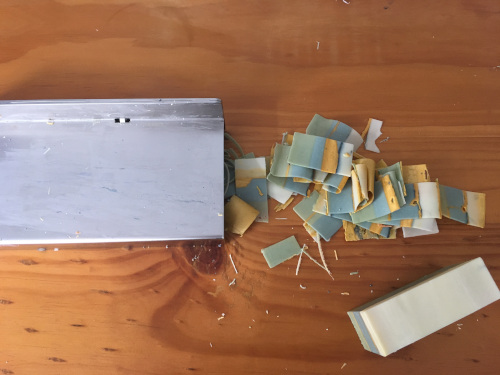
Here you can see a trail of soap destruction as the sides and faces of the soap were planed. This was necessary as some of the gold soap leaked and stuck to the sides of the soap. The soap beveller/planer is from LiluSoap Tools and I absolutely love mine and would wholeheartedly recommend it if you sell your soap or if you just like to geek out about tools like me.
As an added, gross little bonus I have little bits of the carved out soap suspended in the leftover "gold resin". this was from the first batches I did, and you can see that the "gold" soap has an awful, crumbly texture. I don't know why I did this.....or why I'm showing you.......I felt a lot of rancour looking at the ugly little soap so I didn't bother doing it again with my later batch:
Last edited by a moderator: